Learn To Draw A Crown: Easy Step-by-Step Tutorial
Can anyone truly grasp the allure of royalty and the grandeur it represents? The answer lies in the enduring symbol of power, prestige, and artistry: the crown.
The drawing of a crown, whether destined for a king, queen, or a princess, has long been a popular subject for artists of all levels. It serves as a captivating subject due to its intricate design, the symbolic meaning it carries, and the potential for artistic expression. It's an invitation to explore the realm of imagination and learn step-by-step how to construct, outline, and color a crown that appears to glitter and glow with all the riches in the world. From construction to coloring, learning how to draw a crown offers a rewarding activity that blends artistic skill with historical and symbolic significance. This guide delves into the captivating world of drawing crowns, offering a comprehensive guide for artists of all levels.
Let's delve into the world of crowns with this table, offering details about some historical significance and popular designs.
| Attribute | Details |
|---|---|
| Historical Significance | Crowns have been symbols of royalty and power since ancient times. They were worn by kings, queens, emperors, and other rulers. The materials and designs of crowns often reflected the wealth, status, and cultural values of the era. |
| Popular Designs |
|
| Symbolism | Crowns represent authority, legitimacy, and divine right. They symbolize the role and responsibilities of the ruler and the weight of their position. |
| Materials and Embellishments | Crowns have been created from precious metals like gold and silver, and embellished with gemstones (diamonds, rubies, sapphires), pearls, and other precious materials. |
The journey of learning how to draw a crown, one starts with the essential tools. The art of crafting a crown drawing requires minimal supplies but maximum creativity. You'll need a pencil, an eraser, a sheet of paper, and a ruler. In addition, you might want to have colored pencils, crayons, markers, or other coloring materials, as well as a black pen to create bold outlines. While these tools are basic, they are the foundation upon which you will build your magnificent drawing.
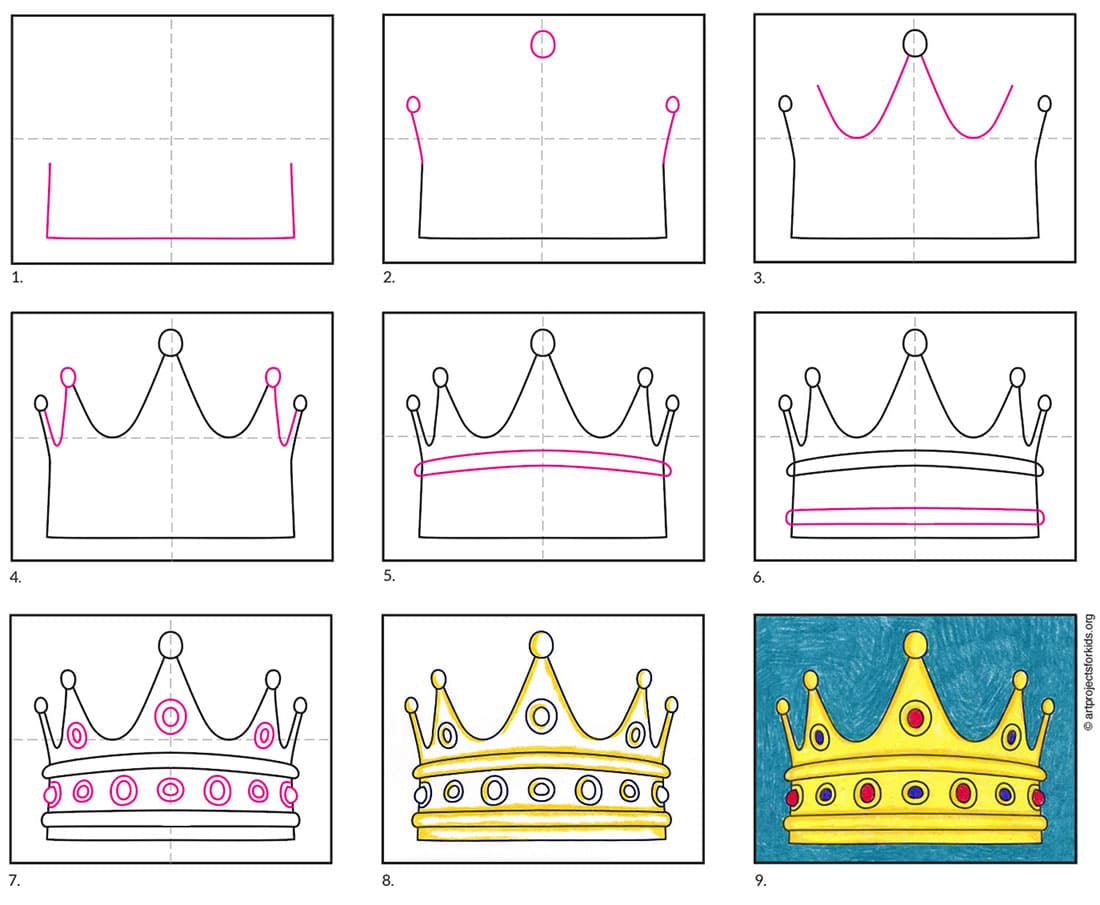
To begin, start with a step-by-step guide on how to approach your drawing. Start with a wide 'U' shape. Then, angle the sides outward slightly and add three circles, which can be varied in size and spacing to the design. Draw two symmetrical curved shapes, connecting them with two more circles and curves. These curves will form the base and accent of the crown. Now, its time to consider additional components by drawing a wide band near the top and another band near the bottom. To add the final touch, include an assortment of jewels of different shapes and sizes within the crowns peaks and structures.
Lets begin by drawing the bottom part of the crown. The base often has a band with a furry texture to create a realistic effect. So, start by making a gentle drawing of the crown's bottom shape, making a gentle curve for the base of the crown, and then draw two short horizontal lines on either side to create the band. Draw an ellipse on the bottom, followed by a similar one just above it. Together, they will form the band at the crown's base. Inside, draw two more ellipses, slightly apart from the first pair, to add more layers to the band.
The creation of points on your realistic crown drawing is next. Begin to shape the crown's peaks. Create the first crown peaks by drawing two 'U' shapes that extend from two side circular shapes toward the central circle at the crown illustration's top. In the middle, add two elements in the same manner as in the previous step. At the top of the crown, draw small circles. These circular elements will become focal points, making the crown visually engaging.
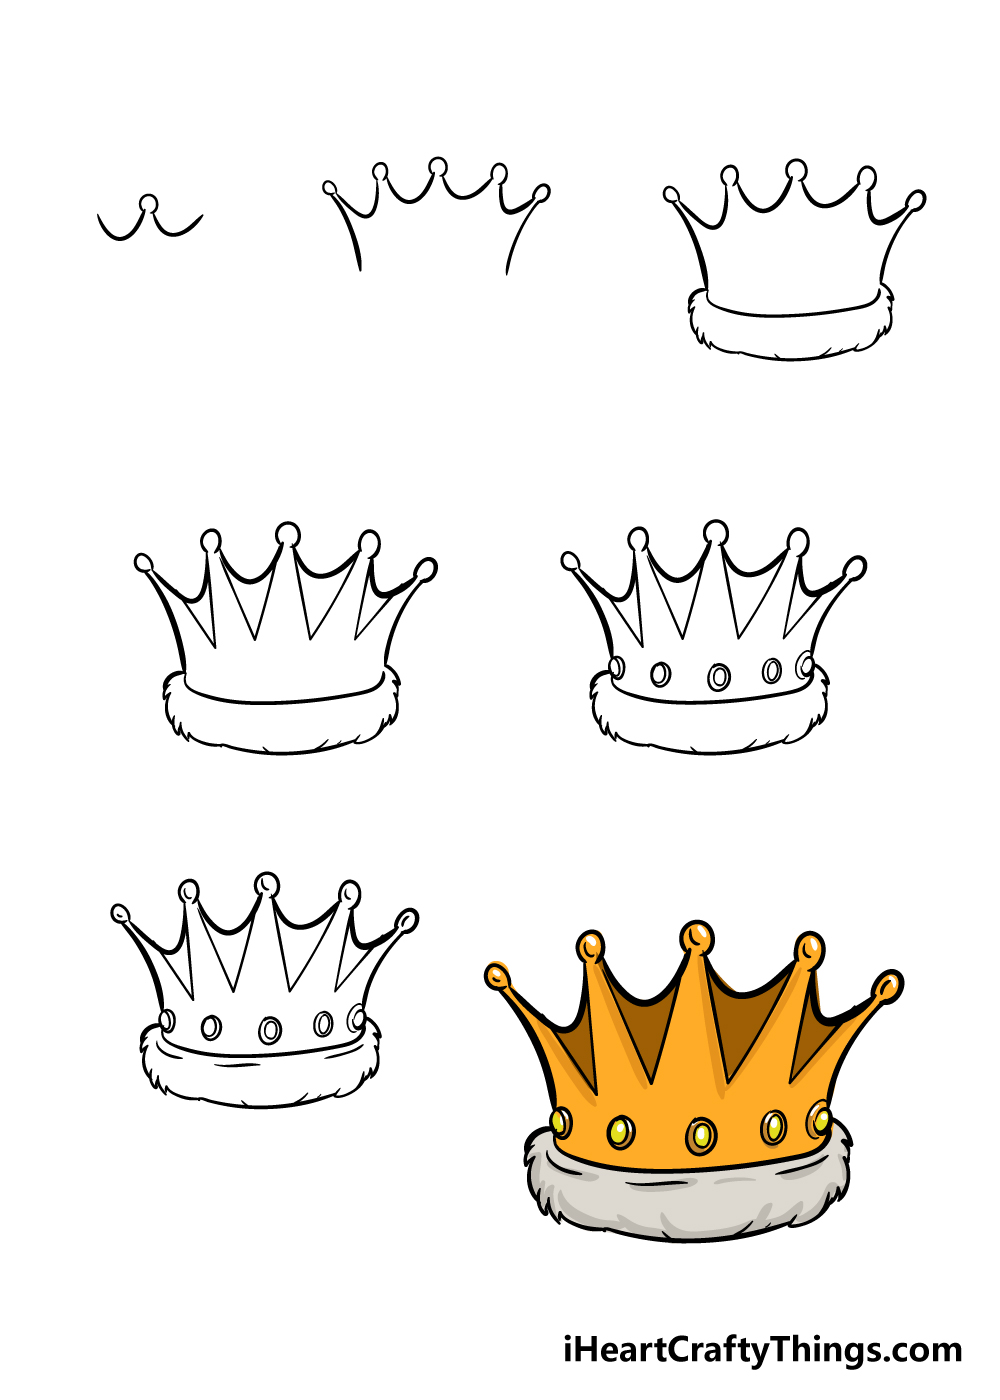
In the world of drawing, one can start with the most basic of shapes: the triangle. Begin with a big triangle for the main part of the crown. Then, add a smaller triangle on top for the pointy part. Next, draw two rectangles on the sides to give structure to the crowns base. Add small circles at the top to further enhance the design. These small steps create the crowns basic shape.
A step-by-step approach is the key to creating the crown, starting with the line of symmetry, an important guideline for your crown. Draw an ellipse at the bottom to begin. Then, draw another identical ellipse a bit higher, that together will create the band on the bottom of the crown. Next, draw two more ellipses inside, a little further from the previous ones. To give the crown its form, you can now add the sides of the princess crown by drawing two identical, symmetrical curved lines from both ends of the previously drawn arc. These techniques offer a simple way to draw the crown step-by-step.
An alternative way is by learning how to draw a crown using basic shapes is a valuable exercise for both beginners and kids. This approach helps simplify the complex design of a crown into manageable elements, making the drawing process more approachable. Following this method, you can easily draw a crown with easy drawing instructions and video tutorials.
Drawing with markers adds another layer of creativity. Learning how to draw a crown with markers is easier than you might think. The crucial point to consider when using markers is to use alcohol-based markers if you want to blend your colors together. Brands like Bic, Sharpie, and Copic are excellent examples. By tracing and coloring with a golden yellow and finishing with a light yellow, the crown will come to life.
Another approach is to incorporate geometric precision into your drawing. The first step involves drawing a curved line for the base and two short horizontal lines on either side to define the initial structure. Between the ridges, two more diamond shapes. Next, draw perpendicular lines across them to highlight their structure. Then, enclose a triangle on each of the crowns sides. Finally, draw a horizontal line across each one to define the diamonds as viewed from the side.
The use of ellipses plays a key role in the crown's structure. Draw an ellipse on the bottom to establish the base. An identical ellipse a bit higher creates the band on the bottom. Then, draw two more ellipses inside, a little farther from the previous ones. These simple shapes begin to form the crown, providing a strong base for the more detailed elements.
When it comes to coloring, its a crucial part of bringing the crown to life. To make your crown sparkle, follow these steps: begin with a base layer of gold or yellow. Once this layer dries, highlight the edges and points with a lighter shade. You can use colored pencils, markers, or even watercolors to add depth and shine. As you color, consider the light and shadow. A touch of darker yellow on the underside of peaks and in crevices will add dimension, while bright highlights on top will enhance the sparkling effect. This play of light and shadow will provide a touch of realism to the drawing.
Drawing a crown is a rewarding experience. Start by following these simple steps, and by following the instructions you can easily create a perfect crown. It offers a blend of artistry, symbolism, and the opportunity to explore the allure of royalty.

